Posts Tagged ‘tables’

h1

Word: Stable tables

October 31, 2023

Several of my clients put humungous tables into their reports—I encountered two tables earlier this week that took up 330p in a ~900p document (yes, I have suggested they remove them from the main doc and add them as one or more separate appendices). The tables I see from my clients are not only long, but they also have many columns and invariably cannot be displayed or read easily unless in landscape orientation and possibly on A3 paper. The tables aren’t particularly complex—mostly just text, sometimes with bulleted lists and sublists. But sometimes they also have merged cells or vertically oriented text (e.g. for a column header or a cell on the far left)—these things can affect the stability of a table. But by far the main reason I see unstable (‘wonky’) tables is to do with the table properties, particularly the table alignment and text wrapping properties.

My client called in desperation to see if I could ‘fix their wonky tables and the one that goes off the page’. They described the ‘wonky’ tables as jumping around and not sitting where they should (parts had moved up and covered the header footer area). Naturally, they were finding these tables a nightmare to work with.

Based on their description and seeing the tables for myself, I had a good idea what was causing both issues—yes, table alignment and wrapping, and in the case of the one that ran off the right edge of the page, the width setting.

I right-clicked on the first table and chose Table properties from the shortcut menu. And here’s what I found—the alignment was set to Center and the wrapping was set to Around (see screenshot below). No wonder this thing moved around! I immediately changed those settings to Left and None and solved the problem immediately—they now had a stable table.

Center alignment and wrapping set to Around WILL cause problems. Instead, set the alignment to Left and the wrapping to None.

The second table had similar settings, but with the added setting of a width greater than the page size—-it was set to Left alignment (good), but Around wrapping (bad), AND the width was set to nearly 130% of the page width (also bad), which means the table went off the visible page in Print Layout view (it would’ve looked fine in Draft view). Again, a simple fix—set the wrapping to None and change the preferred width to 100%.

This table went off the page because of that 127.8% width setting, and was wonky because of the Around wrapping setting. Change the width to 100% and wrapping to None and you’ll see all of your table on the page and it won’t move. And make sure Alignment is set to Left.

All done! Although this took only short time to fix, it took me decades to acquire this sort of knowledge—the client could still be fighting these tables in frustration without knowing how to get them back in line.

Bottom line: For a stable table, go to the Table Properties and set the alignment to Left, the wrapping to None, and the maximum width to 100% but no more (a % width is best because if you switch from portrait to landscape or vice versa, or A4 to A3 etc., the table will automatically resize to fit that percentage width on the new page size/orientation).

h1

Word: Table formatting issues

February 17, 2023

I received a document from a client with a plea for my help in sorting out a whole heap of issues with their tables in a Word document. Many of these tables had been created by others or been copy/pasted into Word from other documents. Many had merged cells and/or text set vertically, not horizontally. Most were long tables spanning 5 or more pages. In this long post (grab a coffee!), I’ll outline the issues (with examples), address how I dealt with each issue, and then offer some best practice suggestions for dealing with long and complex tables coming from various sources and authors.

Some of the issues included:

  • Cells that didn’t line up
  • Table header row not repeating, and not able to set text wrapping to ‘none’ (text wrapping set to anything other than ‘none’ is often the reason a header row won’t repeat—se this blog post: https://cybertext.wordpress.com/2010/03/26/word-header-row-wont-repeat/)
  • Rows not breaking across pages—and not able to turn that option on
  • Empty rows that couldn’t be deleted without creating all sorts of other problems

As an example, this table had misaligned cells and borders:

Images hows a table with borders and cells in the wrong places and not aligned with the borders and sizes of the column headers

This one has misaligned cells, empty partial rows, and the 2 left columns are actually merged with those on the previous page:

This table has misaligned cells, empty cells, and merged cells in the first 2 columns

In this example, the Table Properties option for no text wrapping is unavailable for selection. NOTE: The table I selected does NOT include the other table immediately below it (the one with the red left column)—this different table was a clue as to why the text wrapping of the selected one couldn’t be set to ‘None’:

In the Table Properties, the option to set text wrapping to 'none' is unavailable

And in this one, the option to allow the row to break across pages is unavailable:

Option to allow row to break across pages is unavailable

You might think that these are all unrelated issues, but in many ways they are related. And many of them are associated with merged cells and text direction.

Here’s how I dealt with each issue. Note: For all these there are several things you can try; some you may have to try in combination with others. Often, this is a process of trial and error until something works.

Cells not aligning

  • Follow the advice here and see if that solves the problem: https://cybertext.wordpress.com/2022/07/13/word-table-cells-wont-align/
  • Try selecting the cells that are unaligned and drag the cell borders to match the column header borders as closely as possible (they may not snap in, but that’s OK); you will have to do this for each group of cells.
  • If that doesn’t work, set the Autofit option to AutoFit Window and try dragging the selected unaligned cells again.
  • If that still doesn’t work, set the AutoFit option to Fixed Column Width and try dragging the selected unaligned cells again.
  • Assuming one of those works, select the entire table and set to AutoFit Window to see if the cell borders remain aligned.

Table Layout options for AutoFit

Table row not repeating and no option to turn off text wrapping

  • Follow the advice here and see if that solves the problem: https://cybertext.wordpress.com/2010/03/26/word-header-row-wont-repeat/
  • If the text wrapping option for ‘None’ is not available, it’s very possible you have another table butted up (but not joined) below the one you selected, AND that table has at least one column where the text direction is something other than left to right:
    • If so, select that other table, then click the Text Direction button on the Table Layout tab until the arrows point left to right. You can always reset the direction later.
    • After the text direction in the second table is horizontal again, go back to the first table above it and check the text wrapping options under Table Properties—None should now be active and you should be able to click it. This will allow the header row to repeat.
    • Changing the text direction may also automatically join the tables, which means you’ll have much greater control over them than if they are separate.

Text Direction icon on the Table Layout tab

Rows not breaking across pages—and no option to turn this function on

  • This one also directly relates to text direction. If one of your columns (even one cell?) has a text direction other than left to right, you lose the option to allow rows to break across pages.
  • The solution is to select the whole table, then click the Text Direction button on the Table Layout tab until the arrows point left to right.
  • Once you’ve done that, the option to break rows across pages becomes available again.
  • NOTE: If you reset the text direction to something other than left to right, you will lose that option again and the rows WON’T break across pages, even if they did before. I think this is a bug, not a feature.

Deleting empty partial rows

There are some hidden dangers when deleting partial rows, such as those shown in the second screenshot above. If you choose the wrong option and don’t realise what’s happened until later, you could have a real issue getting the remaining content back in the right place, or a problem aligning cells. My strongest advice is to test on a sample table in a new document to see what happens. And when you do it on your main document, watch carefully for content getting deleted that you want to keep.

  • Select the row you want to delete. If there are merged cells as in my example above, just select the empty cells in a row, not the merged cells.
  • Right-click on the selection and select Delete Cells. You get 4 options and the one you choose here will dictate how your table behaves:
    • Shift cells left is the default, but DO NOT choose this one. If you do, the cells will delete and you’ll be left with only the cells you didn’t delete. The table will then be out of whack—if you have a 5-column table, for example, and do this to 3 cells in a row, your main table will remain at 5 columns, but the row where you deleted the cells will now only have two columns and a heap of empty space. Fixing that is a nightmare.
    • Shift cells up is also not recommended unless the cells/row are at the very end of the table. Why? Because when you ‘shift cells up’, all the content in the cells in the rows below those selected will move up one or more rows, but the cells NOT selected will not move. Let’s say you have 4 columns and multiple rows, and you want to keep the first columns as is, but remove 3 cells in, say, row 5. If you choose this delete option, all the contents of the first column will remain, but the content of row 6 will move into the space where row 5 was, row 7 into row 6 etc. Which means the content of the first column and the content of the cells in the right 3 columns will not match. The screenshots below show the before and after—I highlighted in yellow the cells I was removing in row 5 and in pink the cells in row 6. In the second screenshot, you can see that the yellow highlighted cells have gone, but the row 6 content has moved into row 5.
      • An alternative to consider for the ‘shift cells up’ option in very large tables with lots of merging is to split the table for each main section, delete the relevant rows, then delete the paragraph mark created when you split the table to rejoin the tables. It’s time consuming but it keeps everything in order.
    • Delete entire row is the recommended option, but please check.
      • If you only have the one standard row, the entire row will delete, as expected, no matter what cells you’ve chosen to delete.
      • If you have a merged set of cells for two rows in the first column, and you select 3 cells in ONE row on the right, you can lose not only the 3 cells on the right, but also the content in the first column (watch out for this deletion)
      • If you have a merged set of cells for multiple rows in the first column, and you select 3 cells in ONE row on the right, provided that row is not row where the first column’s cells were merged, the cells will delete correctly. However, if the cells are in that first row where the text for the merged cells is, that will delete too.
    • Delete entire column is not applicable to this situation and you wouldn’t chose it.
  • One other alternative to using these delete options is to draw table lines or split cells to effectively ‘unmerge’ the cells and get back to a standard layout, and then delete the unwanted rows. Merge again once finished.

Before and after screenshots of what happened with option 2:

Best practice suggestions when creating large tables

  • Add everything you need to the tables and get it finalised and signed off BEFORE you consider merging cells etc.
  • While working on the table and while it is still being developed or reviewed and changed, keep all the standard cells and remove the relevant visible borders to emulate merged cells, but do not merge them until the end.
  • Where possible, avoid changing text direction as this will deactivate the ‘allow row to break across pages’ setting. If you need to change text direction, do this as one of the last steps once the table has been finalised and watch for big gaps where the rows won’t split. Again, consider NOT merging any cells spanning a number of rows for the purposes of changing text direction.

Remember, Word is a word processor not a design tool, and while you can do lot of things with tables, there are limitations and traps for the unwary.

[Links checked February 2023]

h1

Word: Table cells won’t align

July 13, 2022

A client had an issue with a Word table—the cells, columns, and rows wouldn’t align no matter what she did. I’ve encountered similar situations many times (possibly because track changes is on when people add/remove table rows or cells, or they try do things with merged table cells without realising that they are merged, or they try to join one table to another). Invariably my ‘go to’ method (after spending a few minutes and getting nowhere) is to start a new table from scratch and copy/paste the cell information into it. Tedious for sure, but sometimes it’s the only way to salvage your sanity—and the table!

However, a few weeks ago I read about another trick to get table cells to align (the first method listed here: https://wordribbon.tips.net/T009924_Adjusting_Column_Widths_on_Joined_Tables.html), so I thought I’d try that on the client’s table as a first step, and it worked beautifully!

Here’s what her table looked like—I’ve blurred the content, and added arrows pointing to where things went wrong. In addition to the columns not aligning, the row ends didn’t align, and some parts of the table were missing borders.

Here’s how I aligned it in just a couple of seconds (Word 365 for Windows):

  1. Select the whole table.
  2. Go to the Layout tab (the one to the right of the Table Design tab—NOT the one for page layout).
  3. Go to the Cell Size group.
  4. In the Cell Size group, put a small value in the Width field (I used 0.2 cm). This gives you a narrow table.
  5. Click the drop-down arrow for AutoFit, then choose AutoFit Window. Your table columns and rows should now be aligned and you can now adjust them, as necessary.

NOTE: I’ve since had further issues, and this trick didn’t work for them all. The tables it didn’t work on all had some merged cells, so I split cells to get them back to the same number of columns as the main table, and then this trick worked. If you still need to keep those cells merged, then make sure no further changes will be done to the table and remerge as necessary (or use no borders for the cell dividers if you don’t want to remerge).

[Link last checked July 2022]

h1

Word annoyance: Insert row/column icon appears when try to select a row/column

January 26, 2020

Update: You can now turn this off in recent versions of Word for Office 365 (possibly Word 2016, and 2019 too)! Thanks to Lene Fredborg, who commented on this post (below), the solution is File > Options > Advanced, Display section, clear the Show pop-up buttons for adding rows and tables.

I’ll leave the original post here for the workaround for those on earlier versions that don’t have this option.

**************

Since Word 2013 (Word for Windows, not sure about Mac), you haven’t been able to select a table row or column easily from outside the row/column, without inadvertently inserting what you’re trying to select! Instead of hovering the cursor immediately to the left of the row/above the column and then clicking to select, Microsoft added these (not so) helpful tools that insert a new row/table, and you have to fiddle with the mouse a bit to move the cursor a tad further away to get table row/column select mode. I suspect they added this icon for those using touch screens, but they are more of a curse than a help to desktop users with a keyboard and mouse. More times than not, when I want to select a row/column to delete it, I end up clicking one of these ‘helpful’ icons and add a new row/column instead, which means I now have to delete two rows/columns! This is what one of these not so helpful icons looks like when you hover your cursor to the left of a row:

Outline of table with the insert row icon highlighted

A quick search of the main websites for Word issues indicates that there’s no way to turn these things off.

Possible solution

However, I did come across a way to disable them that may be useful if you have a lot of table manipulation to do, and that’s to switch to draft view, where these tools won’t appear. Switching to draft view is clumsy in itself (Microsoft inexplicably took away the Draft icon from the icons on the right of the status bar several versions ago), but it may be the solution you need if you’re fiddling with the rows/columns on a large table or on several tables:

  • To switch to draft view, go to View > Draft.
  • To switch back to print layout view, click the relevant icon in the status bar, or go to View > Print Layout.


h1

Word: Macro to autofit all tables to the window size

February 17, 2019

Some 11 years ago, I published a macro for setting all tables to autofit to the width of the page (i.e. within the page margins). Here’s a slightly different version written by Stefan Blom in 2012—his original macro was called SetFitToWin, but I’ve modified that for my purposes so I can easily see from the name what this macro does. Copy/paste all the text of this macro—some goes off the page, so don’t retype it because you might miss some.

Sub SetTableToFitToWindow()
' From Stefan Blom (April 2012):
' https://answers.microsoft.com/en-us/msoffice/forum/all/set-table-to-default-autofit-to-window/a0fffbad-0081-436c-b932-decf404cd88f
' Adapted title (was SetFitToWin), Rhonda Bracey, Cybertext Consulting, Feb 2019

    Dim t As Table
    For Each t In ActiveDocument.Tables
        t.AutoFitBehavior wdAutoFitWindow
    Next t
End Sub

The same caveats apply as per the original blog post in 2008—this changes ALL your tables, so test on a copy of your document first to make sure you don’t inadvertently change tables you didn’t want to change.

[Links last checked February 2019]

h1

Word: Macro to add left and right padding to all table cells in a document

January 18, 2019

Here’s an issue I found in a document I was editing this week—someone had set most of the tables to have 0 cm padding for the left and right margins of each cell (the default is 0.19 cm for metric users). This meant the text butted right up against the cell borders (it was most noticeable on the left as I was using ragged right justification). I needed to change the cell padding back to 0.19 cm.

This is easy enough to do if you’ve only got one or two tables to fix (select the table, right-click and select Table Properties; on the Table tab, click Options, then set the left and right margins to 0.19 cm; click OK to save and exit).

But this was a nearly 300-page document with hundreds of tables, many of which had their margins set to 0 cm. Off to Google to see if someone had a quicker way. They did. I tested the macro and modified it a bit for my purposes, then ran it on a copy of my big document and fixed the problem on all tables in my document in seconds.

Notes:

  • This macro will set the left and right margin padding for ALL tables in your document. In most cases that’s what you’ll want, but if you want some tables to have different padding, change those tables or cells manually after running this macro.
  • ALWAYS test on a copy of your document before running the macro on your main document!

Here’s the macro (I suggest you copy it from here so that you get all of it—on some devices, the text may go off the screen):

Sub TablePadding()
'
' TablePadding Macro
' Adapted from a macro by Greg Maxey: https://answers.microsoft.com/en-us/msoffice/forum/all/vba-code-to-set-all-word-tables-left-cell-margin/420672d4-d294-40a9-8832-7bebb3ab9bf0
' Set left and right cell padding for ALL table cells to 0.19 cm
'
Dim oTbl As Word.Table
 For Each oTbl In ActiveDocument.Tables
    oTbl.LeftPadding = CentimetersToPoints(0.19)
    oTbl.RightPadding = CentimetersToPoints(0.19)
 Next

Thanks to Greg Maxey for the original macro that I modified. If you want to change the padding to be smaller or larger, change the 0.19 value to a smaller or larger number.

h1

Word: Automatically sorting a list

June 10, 2015

Based on a Writing Tip sent to my work colleagues…

***************

Based on a question I got today, I realised that some of you may not know that you can get Word to automatically sort a list for you, whether that list is a bulleted list of words or rows in a table (e.g. a list of terms or of numeric values).

Here’s how.

  1. Turn off track changes if it is on.
  2. Select the bulleted list or click anywhere in the table.
  3. Click the AZ icon on the Home tab to open the Sort window.

    sort01
  4. On the Sort window, select how you want the list sorted – the default is ascending (alphabetically if words, numerically if numbers) and by the first column (if you are in a table). The options available on the Sort window vary depending on whether you’re sorting a table or not.
    sort02
  5. Click OK.

That’s it! Your list is now sorted.


h1

Word: Table or table row goes to next page

September 18, 2014

Based on a  writing tip I wrote for my work colleagues.

********************

Sometimes a table or a table row can shift to a new page and you don’t know why or how to get it back. There are several possible reasons a table or table row might do this, and several ways to get the table or row back to where you want it.

Table rows

There are three main reasons for a table row to start on a new page:

  • Table setting for ‘Allow row to break across pages’: Select the table row, right-click and select Table properties. Go to the Row tab, and see if Allow row to break across pages is checked or not. If it’s not, a row with a lot of information will start on a new page instead of splitting across the page break.

table_rows2014_03

  •  Paragraph setting for forcing a row to remain with the following row or paragraph: Select the first table row that’s on the new page, go to the Home tab, and click the tiny little arrow icon in the bottom right corner of the Paragraph group (see image below) to open the Paragraph dialog box. Go to the Line and Page Breaks tab and see if Keep with next and/or Keep lines together are checked. If so, that means that the row you selected is set to stay with the following paragraph, whether that’s another row or a normal paragraph.


  •  Paragraph setting for forcing a row onto a new page: Select the first table row that’s on the new page, go to the Home tab, and click the tiny little arrow icon in the bottom right corner of the Paragraph group to open the Paragraph dialog box. Go to the Line and Page Breaks tab and see if Page break before is checked. If so, that’s what’s forcing the row to the next page.

table_rows2014_01

table_rows2014_02

Entire table


Now, what about tables starting on a new page when they probably shouldn’t? Again, there are several reasons for this occurring:

  • Hard page break or empty lines (paragraphs) inserted in front of the table: Delete the page break and/or empty paragraphs and see if the table moves back.


  • ‘Section break (Next page)’ inserted in front of the table: BEWARE! Deleting section breaks can mess up page orientation and/or headers/footer. If you do delete a section break, check that nothing else was changed on the pages on front of the table AND after it (check the page orientation and headers/footers); if it all goes pear-shaped, immediately undo the deletion of the section break.


  • Paragraph setting for forcing the header row onto a new page: Select the first table row that’s on the new page, go to the Home tab, and click the tiny little arrow icon in the bottom right corner of the Paragraph group to open the Paragraph dialog box. Go to the Line and Page Breaks tab and see if Page break before is checked. If so, that’s what’s forcing the row to the next page.


  • Paragraph setting for forcing one or more rows to remain with the following row or paragraph: Select the entire table, go to the Home tab, and click the tiny little arrow icon in the bottom right corner of the Paragraph group to open the Paragraph dialog box. Go to the Line and Page Breaks tab and see if Keep with next and/or Keep lines together are checked. If so, that means that table is set to stay with the following paragraph. If either of these check boxes is shaded, it means some of the rows are set to ‘Keep with next’ and/or ‘Keep lines together’ so click the check boxes until they are clear.


One way to check if there’s a paragraph setting that’s controlling the table row(s) is to have your formatting marks turned on and look for a little black square at the far left of a table’s row(s). That black square indicates that a paragraph setting (not a table setting) applies to the row(s). For more details on turning on your formatting marks and the black square, see:

table_rows2014_04

[Links last checked September 2014]

h1

Word: Assigning automated cross-references

August 8, 2014

Based on a Writing Tip I wrote for my work colleagues. Warning: LONG! as there are different instructions for each type of cross-reference.

****************

In many of the Word documents you write, you may need to refer the reader to another section, an appendix, a table, or a figure, or numbered reference in a References list. You do this with a cross-reference (e.g. ‘see Table 5-2’). Although you can just type the cross-reference (x-ref), if you add more sections/tables/figures etc. or delete some, then some or all of your typed x-refs will be incorrect and take the reader to the wrong place.

The solution is to use automated x-refs.

That way, when you add/move/delete sections/tables/figures etc., you just need to update the fields in your document to automatically update the x-ref numbers to reflect the new numbering of these elements. The other advantage of automated x-refs is that they are clickable in the Word document (Ctrl+click) and sometimes in PDFs (depending on the Acrobat settings) – in both cases, clicking the link will take you straight to the place referred to.

Assumptions: All the instructions below assume you are working in a document that is based on a template that uses:

The instructions vary a little for each type of cross-reference—figure/table, section, appendix, numbered References list item. However, for each you will start with the References tab > Captions group > Cross-reference button:

x-ref_refs_tab


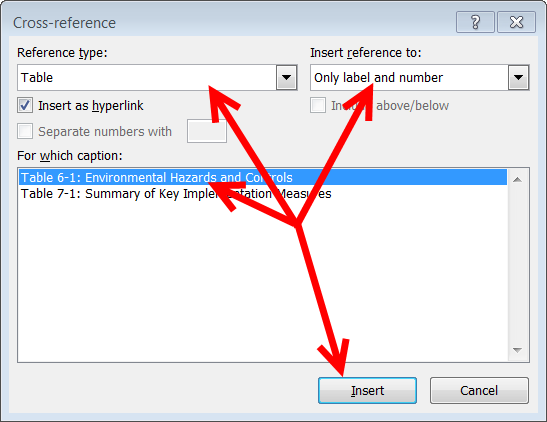
Insert an automated cross-reference to a figure or table

  1. Place your cursor in the text where you want to insert the cross-reference.
  2. Go to the References tab > Captions group, then click Cross-reference.
  3. In the Reference type field, click the drop-down arrow and select either Figure or Table (they’re at the bottom of the list).
  4. In the Insert reference to field, click the drop-down arrow and select Only label and number.
  5. Select the figure or table from the list in the lower half of the dialog box.
  6. Click Insert.

x-ref_fig-table

Insert an automated cross-reference to a section

  1. Place your cursor in the text where you want to insert the cross-reference.
  2. Type the word ‘Section’ and a space.
  3. Go to the References tab > Captions group, then click Cross-reference.
  4. In the Reference type field, click the drop-down arrow and select Heading.
  5. In the Insert reference to field, click the drop-down arrow and select Heading number (no context).
  6. Select the section from the list in the lower half of the dialog box. Hint: If it’s a long list, type the main section number – e.g. type 8 to take you straight to headings starting with ‘8’.
  7. Click Insert.

x-ref_section


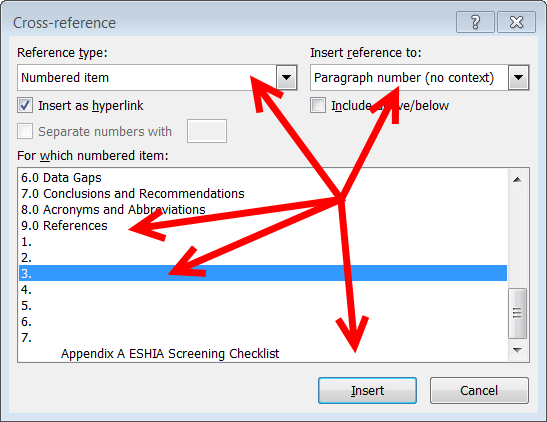
Insert an automated cross-reference to an appendix

  1. Place your cursor in the text where you want to insert the cross-reference.
  2. Go to the References tab > Captions group, then click Cross-reference.
  3. In the Reference type field, click the drop-down arrow and select Numbered item (first in the list).
  4. In the Insert reference to field, click the drop-down arrow and select Paragraph number (no context).
  5. Select the appendix from the list in the lower half of the dialog box. Hint: Appendices are always listed at the END of the list, so you might have to scroll down a long way.
  6. Click Insert.

x-ref_appendix


Insert an automated cross-reference to an auto-numbered Reference list item in a citation

  1. Go to the References section, note its section number (e.g. 9.0), then identify the row number in the References list for the document you want to cite (e.g. row number 23).
  2. Place your cursor in the text where you want to insert the cross-reference.
  3. Type ‘(Ref. )’; make sure you add a non-breaking space (Ctrl+Shift+spacebar) after the full stop, then put your cursor after the space and before the closing parenthesis.
  4. Go to the References tab > Captions group, then click Cross-reference.
  5. In the Reference type field, click the drop-down arrow and select Numbered item (first in the list).
  6. In the Insert reference to field, click the drop-down arrow and select Paragraph number (no context).
  7. Go to the References section (e.g. 9.0)  in the lower half of the dialog box.
  8. Scroll down the list of numbers after the section number/heading and select the number of the row you identified in Step 1.
  9. Click Insert.

x-ref_citation

What happens to the x-ref numbers if I’ve added new tables/figures/sections etc.? How do I update them?

When you add a new section, table/figure, appendix etc. Word automatically applies the correct sequential number for where you’ve placed it. If you move an existing section or appendix, these heading numbers will change automatically too. But tables and figures and all the x-refs DON’T change their numbers until you update all the fields in your document.

Although there are several ways to update all the fields (and therefore the automated numbers), the quickest, simplest, and most foolproof way is to switch to Print Preview mode, then switch back—almost all your numbers automatically update:

  1. IMPORTANT: Make sure Track Changes is turned OFF. Weird things happen if track changes is on, including possibly losing your x-refs!
  2. Go to File > Print. The print preview of your document shows on the right.
  3. Go back to the Home All your fields are updated automatically.

That’s it!

However, this method doesn’t update your table of contents, list of tables, list of figures, etc.—you have to do those separately using the applicable Update Table buttons on the References tab, or use the method below.

To update EVERYTHING in your document at once:

  1. IMPORTANT: Make sure Track Changes is turned OFF.
  2. Select the entire document (Ctrl+A).
  3. Right-click on the selection and select Update Field.
  4. When asked about updating the table of contents etc. select Update entire table and click OK. You may have to answer this several times for each contents list.
  5. Repeat steps 3 and 4 once more to be sure you got everything. Sometimes, the first update will update the numbers for moved figures/tables etc. but not the x-refs too—to be certain you update the x-refs, repeat these steps a second time.


TROUBLESHOOTING

What does ‘Error! Reference not found.’ mean?

You’ll get ‘Error! Reference not found.’ for any x-refs that have nothing to point (refer) to. The most common reason for these error messages is that you’ve deleted a section heading (or a figure/table caption) without realizing that there was a x-ref to it somewhere else in the document. Behind the scenes, Word has unique ID numbers for each x-ref that refers to specific sections, tables, etc. So if you delete the section heading/caption but not the x-ref, Word loses the connection between the two when the fields are updated, and so reports ‘Error! Reference not found.’. The only simple solutions are to:

  • delete the message if the table etc. has been deleted, OR
  • replace the message by creating a new x-ref to the correct place.

What about Section 0?

If you notice some ‘Section 0’ x-refs after you update the fields, there’s a good chance you inserted a new paragraph by pressing Enter at the beginning of an existing section heading and then changed the style of the new paragraph. This screws up the internal IDs. Best practice is to insert a new paragraph at the END of the previous paragraph by pressing Enter. For detailed information on this problem and various methods of solving it, see: http://www.thedoctools.com/demos/demo_crossref_2.html

**********************

See also:

[Links last checked August 2014]

h1

Word: Using tables more efficiently

April 30, 2014

Based on a Writing Tip I wrote for my authors.

********************

We use tables in many of the Word documents we write. Most of the tips below refer to commands on the Table Tools > Layout ribbon:

tables_ribbon

  • Make the table fit the width of the page: Click anywhere in the table, go to the Table Tools > Layout ribbon, then click AutoFit > AutoFit Window.
  • Make selected columns the same width: Select the columns, go to the Table Tools > Layout ribbon, then click Distribute Columns.
  • Sort a table into alphabetical order by the first column (ideal for a list of terms): Click anywhere in the table, go to the Table Tools > Layout ribbon, then click Sort. By default, the sort options are by Column 1, Text, Ascending, and No Header Row, which is correct in most cases for a Terms list, so click OK.
  • Add a new row in between other rows: Select the row below where you want the new row, go to the Table Tools > Layout ribbon, then click Insert Above.
  • Show gridlines on a borderless table: It’s really hard to see where the table cells are in a borderless table, so turn on the gridlines so you can see where the edges are. Click anywhere in the table, go to the Table Tools > Layout ribbon, then click View Gridlines. This setting holds for all documents until you turn it off.
  • Force a row to NOT break over a page: Select the row that you don’t want to split onto the next page, right-click and select Table Properties, select the Row tab, then clear the Allow row to break across pages check box.
  • Make the top row a header row that flows onto the next page when the table splits across a page: Select the first row of the table (you might select more than one row, depending on your column headers and how they are arranged), go to the Table Tools > Layout ribbon, then click Repeat Header Rows.
  • Force a row to stay with its following row, even if there’s a page break: NOTE: Use this one carefully and ONLY where you really need it – don’t use it for every table/every row. Select the row you want to keep with the next row, go to the Home tab, click the tiny grey arrow at the bottom right of the Paragraph section (or press Alt+O+P) to open the Paragraph dialog box, go to the Line and Page Breaks tab, then select the Keep with next check box.
  • Move a table row up or down: You can quickly move one or more table rows up or down a table by pressing Shift+Alt and either the up or down arrow key

Some basics on selecting table elements with the mouse

  • Select the entire table: Move your cursor over the table until you see the 4-way arrow inside a small box at the top left of the table, then click this 4-way arrow. If this 4-way arrow disappears before you can click it, move your cursor away from the table, then back over it to see it again.
    tables_select_table
  • Select a column: Move your cursor to just above the column until it turns into a small black downward-pointing arrow, then click to select the column the arrow is pointing to. You can select more than one column by dragging immediately after clicking the first column.
    tables_select_column
  • Select a row: Move your cursor to the far left of the table (outside it), until it changes to a cursor arrow, then click to select the row the cursor arrow is pointing to. You can select more than one row by dragging immediately after clicking the first row.

tables_select_row