Posts Tagged ‘PowerPoint’

h1

PowerPoint: Macro to change the proofing language

January 13, 2024

Caroline Orr, a UK editor, used ChaptGPT to create a macro to set the proofing language in PowerPoint to UK English, which she says works really well—see her second attempt here: https://www.orreditorial.com/chatgpt-powerpoint-macro/

In that second example, ChatGPT used msoLanguageIDEnglishUK in 2 places in the code to set the language to UK English.

If you wanted to use this macro and change it to another language, then refer to this list from Microsoft for the codes for other languages:  https://learn.microsoft.com/en-us/dotnet/api/microsoft.office.core.msolanguageid?view=office-pia

For quick reference, the codes for other commonly used English languages are:

  • msoLanguageIDEnglishAUS
  • msoLanguageIDEnglishCanadian
  • msoLanguageIDEnglishNewZealand
  • msoLanguageIDEnglishSouthAfrica
  • msoLanguageIDEnglishUS

[Links last checked January 2024]


h1

PowerPoint: Change the colour of some elements

October 15, 2023

One of my clients had an issue with hyperlinks in his PowerPoint presentation showing as a light colour on a white background and wanted to know if I knew how to change the default colour used.

Well, you can, but the settings are lurking deep inside the master slide settings and certainly aren’t easy to find!

  1. Go View > Slide Master.
  2. Then click the Colors dropdown.
  3. Optional: Choose the theme you’re using (if known).
  4. Back on the Colors dropdown again, select Customize colors (at the bottom of the dropdown menu).
  5. Change the colour for Hyperlink and Followed Hyperlink to what want.
  6. Change other colours, if required.
  7. Change the name of the theme (you can’t avoid this as it’s the only way you can save your new settings—you can always delete that theme later).
  8. Click Save.
  9. Exit the Slide Master view and return to your presentation.

If you need to change it for ALL future presentations, find your PPT template and make the change there too (by default your templates are stored under C:\Users\[YourUserName]\AppData\Roaming\Microsoft\Templates).

h1

PowerPoint: Remove alt text but preserve links when creating a PDF

December 1, 2021

One of my clients had a problem. When he created a PDF from his PowerPoint presentation, the PDF displayed the auto-generated alt text for each picture in his slide deck. He’s a geologist so some of the alt text for the images of rock formations was just totally wrong (see the second half of this blog post for examples of weird auto-generated alt text: https://cybertext.wordpress.com/2020/07/25/word-adding-alt-text-to-images/). He didn’t want the alt text, but found that if he turned off the accessibility features in Acrobat, his URL links no longer worked either. He wanted the links, just not the alt text.

I figured out how to achieve what he wanted (i.e. no alt text and clickable URL links) in PowerPoint before you create the PDF. Here’s how:

  1. Click on an image in PowerPoint.
  2. Go the the Picture Format tab.
  3. Click Alt Text in the Accessibility group. This displays the Alt Text panel, populated with some auto-generated text that Microsoft THINKS describes the image.
  4. You can now either:
    • click the Mark as decorative checkbox, OR
    • clear the auto-generated alt text and leave it blank (or type a space).
  5. When you’ve finished your PowerPoint slide deck, go to File > Save as Adobe PDF. The resulting PDF should preserve any URLs you have, and there should be no alt text for any of the images you cleared it from.

A note about alt text: Alt text is absolutely necessary for those with vision issues who use screen readers to navigate computers, website, and digital files, so if your images are of something (and not just decorative), it’s best to add your own alt text describing what’s in the image. Certainly NEVER leave it up to Microsoft’s artificial intelligence as could get some very weird results.

h1

Word: Delete, add, or change author name

April 6, 2019

When you create a document in Microsoft Word, PowerPoint, or Excel, the user name you entered on File > Options > General tab is automatically added as the author name. In most cases, you want this. But what if you don’t? What if the author name is the name of the person who created the template you’re using? Or is the original creator of the document you’re modifying who left the organisation long ago? What if you want to remove that name altogether and add your own name (or some other name) as the author?

(NOTE: Be careful when changing the author name that you don’t break any copyright laws—these laws vary from country to country, but essentially, the author of a document is likely the copyright owner of that document, except perhaps in cases of ‘work for hire’ where the organisation owns the copyright. If in doubt, speak to a lawyer or the organisation’s Legal Department.)

This information applies from Word for Windows 2010 and later.

How to delete an author name in an Office document (Word, PowerPoint, or Excel)

  1. Open the document.
    NOTE: If you want to change the author name in a template, right-click on the template, and select Open to open the template. Do not double-click the template to open it as it will only open a document based on the template, not the template itself.
  2. Go to File > Info.
  3. Right click on the author’s name.
  4. Select Remove Person.

How to add an author name in an Office document (Word, PowerPoint, Excel)

  1. Open the document.
  2. Go to File > Info.
  3. Click Add an author.
  4. Type in the new name, or click the book icon to select it from your Contacts list.

How to change your name for future Office documents (Word, PowerPoint, Excel)

  1. Open a document.
  2. Go to the File > Options > General tab.
  3. Change your name in the User name field.
  4. Optional: Change your initials too.
  5. Click OK.
  6. Close the document.
  7. Check that the new name is applied to a new document—create a new blank document (not based on a template), then check the User name property under File > Options > General tab, and that it’s used as the author name when you go to File > Info.


h1

PowerPoint: Link to a specific place in a Word document

March 14, 2016

I’m doing a presentation at a conference later this month. As I’m a Windows and Microsoft Office user, the presentation will be in PowerPoint, but I’ll be demonstrating some things in Microsoft Word.

I know how to create a link to my example Word document (see Create a standard hyperlink to a Word document below), but I want to link to a specific place in the document. In PowerPoint 2013, a standard link to a Word document opens the document at the top of the first page — every time. At various stages in my presentation, I want it to open to specific places so I can demonstrate the function I’m talking about and not waste time scrolling to that location.

Off to the internet, where after quite a bit of searching I found an answer for another application, but it works beautifully for my circumstances with Word and PowerPoint too.

Before you start

  • I strongly recommend that you put the Word document into the same folder as the PowerPoint presentation. That way, you just move the whole folder to your thumb drive/laptop and the two documents will maintain their links.
  • If you want to use an image for the link (e.g. the word ‘Demo’ in a starburst shape), either create it outside PowerPoint, or insert a PowerPoint shape (Insert > Shapes) on one slide and style it how you want (outline and fill color, shadow, etc.) — you can then copy that shape to other slides and change the hyperlink destination as required.

Create a standard hyperlink to a Word document

Note: This standard hyperlink will only open your Word document at the beginning. To open to a specific place, do the steps below AND all the steps in the Link to a specific place… subsection.

  1. Open your PowerPoint presentation and go to the slide where you want to add the link.
  2. Optional: Insert an image for the link (see Before your Start above), then select it.
  3. On the Insert tab, click Hyperlink.
  4. Settings:
    • Link to: Existing File or Web Page
    • Look in: Current Folder (see Before you start above)
  5. Select the Word document you want to link to from the folder — the file name goes into the Address field.
  6. Click OK.
  7. Test your presentation to make sure the link works as you expect.

word_ppt01

Link to a specific place in the Word document

  1. Open the Word document you want to link to.
  2. Insert your cursor where you want it to open.
  3. On the Word ribbon, go to the Insert tab, then click Bookmark.
  4. Type a name for the bookmark — no spaces, no punctuation characters (e.g. DemoPassive). (Hint: Copy this name as you’ll use it in step 8 and it must be exact.)
  5. Click Add.
    word_ppt02
  6. Save the Word document.
  7. Open the PowerPoint presentation and add a hyperlink to the Word document (as per steps 1 to 5 in the Create a standard hyperlink to a Word document above).
  8. At the end of the file name, add a hash symbol followed immediately by the bookmark name you added at step 4 (e.g. <filename.docx>#DemoPassive). DO NOT add any spaces and make sure the bookmark name is exactly as you typed in step 4; if you copied it at step 4, paste it after the hash symbol.word_ppt03
  9. Click OK to save the hyperlink.
  10. Save your PowerPoint presentation.
  11. If you need to add links to other specific places in the Word document in other slides, repeat the steps above for each new location. (Hint: If you want to use the same location for different slides, copy the hyperlinked image to those other slides.)
  12. Test your presentation to make sure the links work as you expect.

Related

[Link last checked June 2016]

h1

PowerPoint: How to show another app

January 5, 2016

This post is for me so I don’t forget what to do!

In days gone by, if you did a presentation using Microsoft PowerPoint (for Windows) and you linked to another app for demo purposes (e.g. Microsoft Word), then clicking the link would open the app on the screen, covering the presentation until you pressed Alt+Tab to return to the slide show.

However, in more recent versions of PowerPoint (2010 at least and later), this function seems to be gone when you connect your laptop to an external monitor, such as a projection unit. Instead, you get ‘presentation mode’ on your laptop and the presentation on the big screen, but when you click a link to display another app, nothing happens on the big screen, even though you get the linked app showing on your laptop.

This is disconcerting as you think the audience can see what you see, and frustrating as you try to figure out how to get back from the presentation to show the app on the big screen, then back to the presentation again. I’ve been caught with it in the past three presentations I’ve done, and it totally throws you off your spiel, and takes up precious time as you (or a techie) try to get you where you need to go.

Because I’m doing at least a couple more presentations this year, I decided to figure out the best combination of settings to use to display everything I need on the big screen. I connected my laptop to an external monitor and played with the settings to get a combination that works for me.

Here are my settings for future reference (do these in order):

  1. Windows 8.1: Control Panel > Display > Project to a Second Screen > Duplicate
  2. PowerPoint 2013: Slide Show > Monitor — set to Primary
  3. PowerPoint 2013: Slide Show — turn OFF Use presentation mode

What this does is duplicate exactly what’s on your laptop on the big screen. The upside is that you can now click a link in your PowerPoint and open another app and the audience will see it. The downside is that everything on your desktop, task bar etc. can be seen by the audience, so the usual caveats for presenting from many years ago still apply (i.e. don’t have anything on the screen that’s private!).

[If you have an easier way to do this, please share in the Comments]

h1

PowerPoint: Not all AutoCorrect entries are listed

September 30, 2015

This is a strange one that’s easily fixed, but only once you know how!

I set up Office 2013 on my new laptop and transferred all my ACL files from my PC to the laptop — ACL files are the AutoCorrect entries, and I have an extensive list. When I checked in Word, Excel, and Publisher, they were all listed. Outlook doesn’t list any AutoCorrects, but they still work with Outlook. However, PowerPoint only listed the ones that were just letters; it didn’t list those I had prefixed with a period. (See this post for why I use a period in front of many of my AutoCorrect entries: https://cybertext.wordpress.com/2011/03/08/word-use-the-power-of-autocorrect-to-save-heaps-of-time/)

I thought this was a bug in PowerPoint 2013, but when I checked another computer with PowerPoint 2010 on it, I saw the same thing. Hmmmm…

I was about to post to the Microsoft Answers forum to see if anyone knew why, and how I could get my extensive collection of AutoCorrects back without re-entering them. But before I did that I figured it cost nothing to just try one and see if it worked anyway — and it did!

Not only did the AutoCorrect work, but when I looked at the list after using one, they were ALL listed.

So the solution is to type one of your AutoCorrects in your PowerPoint presentation. It will work and all those with period prefixes will now be listed (under File > Options > Proofing > AutoCorrect Options).

Weird.

h1

PowerPoint: Apply a template

April 15, 2015

Microsoft PowerPoint (PPT) doesn’t use templates like Microsoft Word does. You can’t just ‘apply’ an existing template to a deck of PPT slides and assume that all the styles and formatting will automatically update. Sure, you can do things with Master Slides and format painter for individual slides (see the links at the end of the article for some of these techniques), as well as some global things with themes, colors, fonts etc.

But if you’re working in an organization and they have dictated that you now have to use a new ‘template’, how do you easily convert your legacy PPT slide decks to the new ‘look and feel’? I was asked this question and went looking for an answer, and in the process I found a ‘reuse slide’ feature in PPT I didn’t know existed, which, for the most part, applies the new look and feel to an existing slide deck with almost no effort on your part.

Before you start, you should have the organization’s new PPT ‘template’ loaded onto your computer, or know where to find it on the network. In the instructions below, I’ll use a sample template provided with PPT, and one of my own slide decks. In your case, you’ll use your own template and your own slide decks.

  1. Open PowerPoint.
  2. Go to File > New.
    ppt_template01
  3. I then opened Sample Templates (you will likely open ‘My templates’), and selected one of the samples.
    ppt_template02
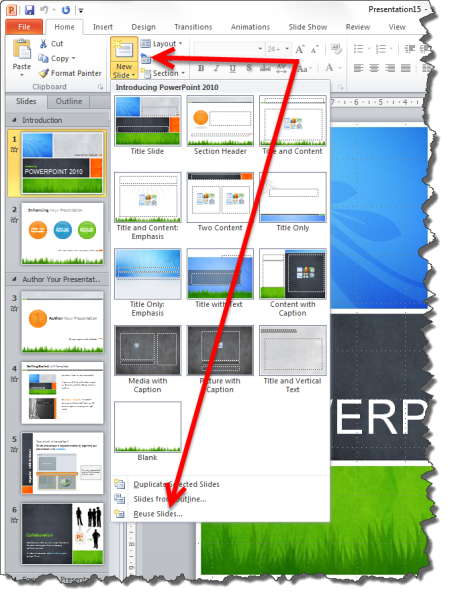
  4. Once the slide deck is open in PPT, click the drop-down arrow next to New Slide and select Reuse Slides.
    ppt_template03
  5. A panel opens on the far right of the PPT window. Click Browse, then select Browse File.
    ppt_template04
  6. Navigate to the old slide deck you want to ‘convert’ to the new template, and click Open. The slides are shown as thumbnails in the right panel.
  7. Right-click in the right panel, and select Insert All Slides.
    ppt_template05
  8. All your slides are immediately added to the new PPT presentation and that presentation’s ‘template’ is applied to them all. You can compare thumbnails in the panels on either side of the main window to see how your presentation has changed.
    ppt_template06
  9. Delete any unwanted slides, then save your ‘new’ presentation.

Notes:

  • As with any such conversion, please check ALL slides after you have changed them to the new look t make sure everything has been captured correctly. I noticed a couple of slides that didn’t convert — I’d added a graphic as a background to these ones, so would have to fix that.
  • Don’t forget to delete all the unwanted ‘placeholder’ slides from the template you used, and then save your work.

See also:

[Links last checked April 2015]

h1

PowerPoint: Adding a sound to an animation

March 25, 2011

When I was hosting the Word part of the Microsoft Labs at the 2011 WritersUA Conference last week, one of the attendees (let’s call him Bill) asked what I knew about PowerPoint and if I could help him solve a problem he had. Well, my PowerPoint knowledge is OK, but I’m not an expert in it. However, with a little experimenting using the right-click options, I was able to solve Bill’s problem in a few seconds! He was most grateful.

Problem

Bill had a set of bullet points he’d animated so that they appeared on individual mouse clicks — click once and the first bullet item appeared, click again and the second bullet item appeared, click a third time and the third bullet item appeared, etc.

He had the animation working as he wanted it to, but as this slide presentation was a looping one that the viewer — not a presenter — controlled, he wanted to add voice to each bulleted item that explained each item.

Solution

(This solution works similarly in PowerPoint 2003, 2007 and 2010, though some of the screen shots will differ in the various versions)

  1. Select a bullet item with animation applied.
  2. If not already displayed, show the Custom Animation pane (called Animation in PowerPoint 2010).
  3. In the Custom Animation pane, right-click on the selected bullet item.
  4. Choose Effect Options.
  5. By default, there is no sound — select a sound from the Sound list, or scroll to the bottom of the list and select Other Sound… If you select Other Sound, a file explorer window opens for you to navigate to and select the sound file to attach to this animation. The only sound files you can select are *.wav files.
  6. Set other options from the Effect and Timing tabs on this window.
  7. Click OK when you’ve finished.
  8. Display the slide in Slide Show view and click to display each bullet item and its attached sound.

Bill was happy! And I was happy that I could help him as I never knew this was even an option in PowerPoint.

h1

Cool PowerPoint tip!

November 11, 2010

Here’s how to extract audio and images from a PowerPoint 2007 or 2010 slide deck:

http://iconlogic.blogs.com/weblog/2010/11/powerpoint-2007-2010-how-to-extract-audio-images-from-a-presentation.html

[Link last checked November 2010; thanks to AJ George of IconLogic, the author of these clear instructions]