Archive for March, 2021

h1

Word: Subscript and superscript weirdness

March 30, 2021

I received a document to edit last week and noticed that a word, which was spelt correctly, had a red squiggly line underneath it.

I checked the spelling language set for the word and it was English, as I expected. I tried retyping the word, and inserting the correct variation from the spelling options. All to no avail. The red squiggly stayed. Eventually, I retyped the whole thing, from CO2 onwards and the red squiggly went away.

I started to notice that some other words weren’t behaving correctly, particularly those with superscripts and subscripts. I couldn’t identify what was causing the weirdness, but then I noticed a TINY speck on the screen. Was it a speck of dust on my screen (memo to self: clean screens more often!) or something in the document? I increased the zoom on the page to 400% and the specks didn’t change size, but they did remain in the same position, so I knew they were IN the doc, and not on the screen.

Here’s an example of these tiny dots. In the first image, the zoom is 100% and the dots are either side of the ‘8’ but at the bottom of the letter forms. These are NOT the periods surrounding ‘min’, but the tiny dots surrounding the subscripted 8. The second and third images are of the same thing, but at much higher zoom percentages—notice that the size of the dots hardly changes. And that they are almost impossible to see.

My first step in trying to identify these dots was to select some text that contained the superscript and the dots and press Ctrl+[spacebar] to remove the manual formatting and take that selected text back to the base style of the paragraph. And that’s when I was able to unmask the weirdness!

Look at what this passage looked like when the manual formatting was removed.

Those tiny dots were actually text—in this case ‘PPP’ surrounding a superscript character. I did a search for PPP and found 37 instances. Each instance surrounded a superscripted number.

Was this the cause of the spelling error for the word after CO2 I’d first discovered and couldn’t fix easily? I went to one of the CO2 instances and selected the tiny dot—it was set to a weird font and was 1 pt in size. A 1 pt font that’s super or subscripted? You’re never going to see that easily!

Then I removed the manual formatting for some text around ‘CO2’ and found that the subscripted ‘2’ was surrounded by the letter ‘R’. I did a search for COR2R and found 854 instances! Find and replace took care of those for me, then I did another search for R2R as this document included H2S, NO2, etc. as well, and cleaned up some more.

The final oddity I found wasn’t surrounding a superscript or subscript at all—instead it was near a semicolon. In the image below, look for the tiny dot on the first line after the space and before the ‘M’, and immediately after the semicolon on the third line.

When I took the manual formatting off, another string of strange characters appeared—’65T’ repeated several times. Again, find and replace sorted those out too.

What had caused them? I contacted the author to find out if parts of this document had been copied from a PDF (the ZWAdobeF font was a clue). They said it hadn’t. Besides, what I found wasn’t indicative of the usual errors you’d find when copying or converting from a PDF. I also asked if anyone had used Word for Mac or worked on this document in Google Docs. ‘No’ on both accounts, as far as they knew. They said it had only been worked on in the corporate environment, but there are things like SharePoint, OneDrive etc. that may be at play here. Not likely, but possible.

So it’s a mystery as to how these things occurred in the first place. And it’s only by good luck and some sleuthing that I was able to identify them and correct them.

h1

Word: Keyboard shortcuts for macros are not working

March 24, 2021

Whoa! I just discovered this one. All of a sudden my keyboard shortcuts to apply specific macros weren’t working. I’d been using them extensively on a 300p document, but suddenly they stopped working. I closed the document and reopened it, but that didn’t make any difference. I tried a couple of other things, but nope, they still didn’t work. I checked that the keyboard shortcuts were still assigned to those macros, and they were. And the macros worked fine if I ran them from the Macros window. So, there was nothing wrong with the macros or the keyboard assignments.

And then I spotted it—the light for CAPS LOCK was on. Could that be it? It was! When I turned it off, my keyboard shortcuts worked fine. To test it, I turned CAPS LOCK back on and the keyboard shortcuts didn’t work. Turned it off, and they did.

What this means is that keyboard shortcuts you assign to Word macros seem to be case sensitive.

h1

How to get the parts of a YouTube video using JDownloader

March 12, 2021

I was testing out JDownloader2 (an open source download manager) the other day for a completely different purpose when I discovered that it can split a YouTube video into its component parts, which you can then download individually or as a group.

Depending on what was uploaded to YouTube, the component parts may include the audio only (M4A format), the video (MP4; includes audio), the title image (JPG), the description (TXT), and/or the subtitles (SRT file).

It’s certainly an easier way to do it than to use a conversion program—just open JDownloader, copy the YouTube URL to the clipboard, and it will automatically get added to JDownloader, ready for you to expand the entry and then download one or more, or all, parts.


h1

Using Logitech Capture software with a Logitech C270 webcam

March 3, 2021

The Logitech C270 webcam is very limited in its settings. You can adjust it a little (see this earlier blog post of mine: https://cybertext.wordpress.com/2020/07/29/logitech-c270-webcam-settings/), but you can’t use the more advanced Logitech Capture software (https://www.logitech.com/en-au/product/capture) with the C270 ‘out of the box’. According to the requirements on that Logitech Capture webpage, the C270 is not supported hardware for that software, and if you download the software anyway, it won’t recognise your C270 webcam.

However, one of my readers, Collin, in a comment on my original post, described how to get Capture to work with the C270. I’ve rewritten his instructions below, adding some screenshots and things I found when I followed them. These instructions are for Windows 10.

NOTE: Update February 2022: If you update the Capture software, then you will have to redo all these steps, so unless there’s a compelling reason to update it, leave it be. And if you do update and can’t save your changes because of a permissions issue, then save as a TXT file to another folder, then delete the TXT extension and copy the file back to the bin folder, saying yes for the admin permissions.

  1. Download the Capture software from the Logitech website.
  2. Virus check the exe file (as you should with any software you download), then install it.
  3. On the Start button, search for and open Device Manager.
  4. Expand Cameras or Imaging Devices (on my computer, my webcam was listed under Imaging Devices—I didn’t have Cameras listed at all).
  5. Right-click on the name of the webcam and select Properties.
  6. On the Properties window, click the Details tab.
  7. Click the dropdown arrow next to the Property field and select Hardware Ids.
  8. The IDs are listed and you will need these in later steps. You can either leave this window open (easiest) or copy them to Notepad (or a similar text editor). The settings for MY webcam are shown below—your VID or PID values may be different, so don’t use those in this screenshot.
  9. Now you need to change the Capture configuration file to add your webcam to the list of supported cameras. Go to the C:\Program Files\Logitech\LogiCapture\bin folder.
  10. Find the LogiCapture.exe.config file.
  11. Optional: Just to be safe, copy this file and rename the copy as z_original_LogiCapture.exe.config—if things don’t work, you can always delete the file you’re about to modify, then remove the z_original_ part of this file’s name to revert back to the original.
  12. Open the LogiCapture.exe.config file in Notepad (or a similar text editor; I use EditPlus).
  13. Press Ctrl+F to open the Find window.
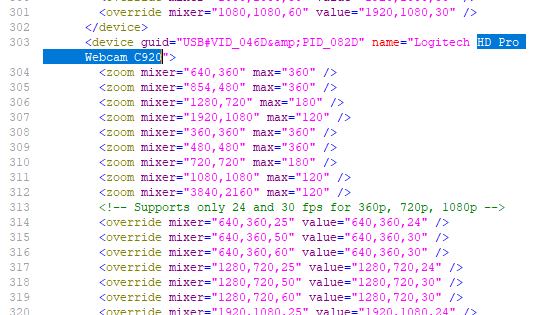
  14. In the Find What field, type HD Pro Webcam C920, then click Find.
  15. The first line found will start with <device guid= and end with that device’s name.
  16. Put your cursor in front of <device guid= for that line, then select from there to the first </device> line you find. (My Edit Plus software shows line numbers and the first line is 301 and the last line for the settings for that device is line 389, so you’ve got a bit of scrolling to do).
  17. Once you’ve selected that whole section for that device, copy it.
  18. Go to the end of the </device> line from Step 16 above, press Enter to create a new line, then paste the selected lines for the original device.
  19. You now need to modify this new section. Don’t worry—you only have to change information on the first line.
  20. In this new section, change the name from Logitech HD Pro Webcam C920 to Logitech HD Webcam C270 (or whatever YOUR device is called in Device Manager—refer back to the open Device Manager window to get the exact name).
  21. The other two things you may have to change are the VID and PID values in the first line. Again, go back to the list of Device Manager hardware IDs for your device. In my case (the screenshot in Step 8), the VID ID was 046D and that was already listed in my first line, so I didn’t need to change it. However, the original PID was 082D and I needed to change that to 0825 (remember, YOUR values may be different). My changes looked like this:
  22. Save the file. You may be asked to save with Admin privileges—click the option to do so.
  23. Check the file name still ends with .config and not .config.txt—if it ends with .txt, delete that part of the file name and click OK when you get the warning that this could make the file unusable.
  24. You can now close Device Manager and any text editor program you have open.

Confirm that Capture can see your C270 webcam

  1. Open the Logitech Capture software.
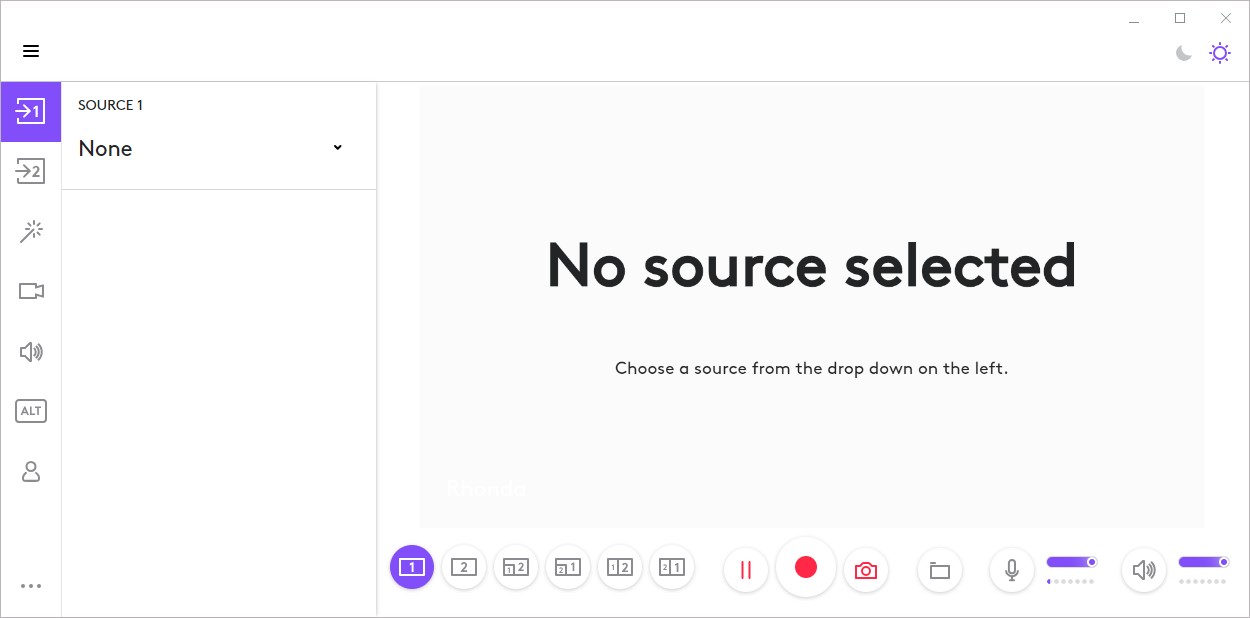
  2. When you first open it, no source (i.e. camera) is selected—you have to tell the software what webcam you’re using.
  3. Click Source 1 in the left panel.
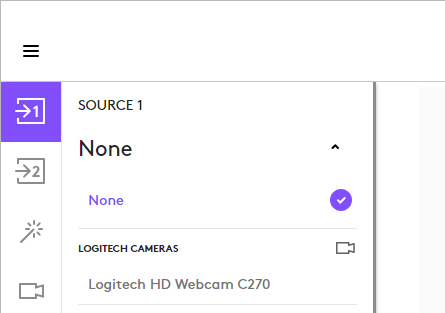
  4. Click the arrow next to None to see all available Logitech webcams you have installed.
  5. Assuming you followed all the instructions above correctly, you should see your Logitech C270 webcam listed.
  6. Select it. Your webcam will turn on.
  7. You can now use all the setting options in the left panel to adjust light, zoom etc. As you change the settings, the camera image on the right changes to reflect those settings. NOTE: Collin recommended that you DON’T change the resolution to anything higher than 720p (the default for me); in his words ‘it will just look like crap’. He also said that some other settings may be incompatible, but only trial and error will show what they are. All the settings I tried for 720p resolution seemed to work, except those that are locked unless you are signed into Logitech.

Again, thank you Collin for the information that allowed me to use Capture software with my ‘unsupported’ Logitech webcam.

[Links last checked March 2021]