Archive for February, 2011

h1

I’ve been told I’m too harsh…

February 28, 2011

… when it comes to reading someone’s resume.

But when someone is applying for an editing job (in this case, editing and formatting a university thesis written in Microsoft Word), I’d expect them to be more than a novice Word user. I’d expect them to have at least a basic knowledge of styles.

So when I see a resume like this, with almost everything styled with Normal and with manual formatting and spacing applied, I cringe:


If you don’t want your ‘dirty laundry’ to show, PDF the darned thing! However, all that does is change the cosmetics — puts ‘lipstick on a pig’, if you like. If this person got the job, I’d hate to think what they’d do to the thesis.

Do you think I’m too harsh? Remember, this is an editing job with Microsoft Word and it required formatting the document as well as editing the words.

See also:

[Links last checked February 2011]

h1

When the employer/employee relationship goes bad

February 25, 2011

Oh dear. The other day, I got this email from the CEO of a real estate company I deal with. I guess the person who was my previous contact there did something wrong, and then she added fuel to the fire by contacting her client list… which I’m guessing was a real ‘no-no’. She hadn’t contacted me, so this email from the CEO was out of the blue:

I guess she really burnt that bridge, huh?

h1

Word: Getting a two-line heading onto one line in the Table of Contents

February 24, 2011

Larry had a problem. He had a heading on two lines, and he wanted the heading to display on a single line in the Table of Contents (TOC).

Here’s an example of what he had; both lines are styled with Heading 1:

Because each line is in a separate paragraph, Word treats them as two separate Heading 1s when it creates the automatic TOC:

What Larry wanted was for the two lines to remain in the body of the document but display on one line in the TOC.

Update September 2020: Make sure Track Changes is OFF.

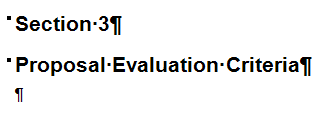
The simplest solution to this is to use a ‘soft return’ (Shift+Enter) between the lines in the body of the document, instead of Enter. It looks like this (with formatting marks showing):

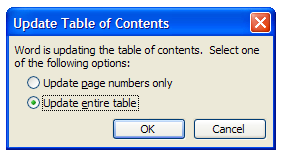
And when you update the TOC, you select Update entire table:

Your TOC now displays the text on one line:

Personally, I don’t like how the title butts up against the section label, so I added five spaces after ‘Section 3’ (I could have used a Tab):

This extra space makes the TOC more readable, in my opinion:

See also: A method to use Style Separator to show what you want to see in a TOC: https://office-watch.com/2021/selecting-heading-words-for-a-table-of-contents/

[Links last checked July 2021]

h1

WritersUA and SoCal tech writers: Gig in Carlsbad

February 23, 2011

My very good friend and brilliant conference presenter, Dave Gash, is playing a gig in Carlsbad, CA, on Saturday 12 March 2011, the night before the WritersUA Conference. I’m sure he’d love you to come and see him play in his one-man band, The Quimbys. I’ve seen his gigs before, and can highly recommend them — especially if you’re a baby boomer as he plays lots of stuff from the 60s, 70s and 80s.

Details:

If you’re driving down from Long Beach, you should be back at the conference hotel before midnight. According to Google Maps, it’s about 80 miles from the Hyatt Long Beach, and takes about 1.5 hours in normal traffic. Maybe hire a car and share the cost amongst friends?

h1

Acrobat: Reduce the file size of a scanned PDF

February 22, 2011

My friend and ex-roomie, Kristin, emailed me with a problem. She had a couple of large PDF documents and she wanted to know if I could reduce them in size without them ‘going fuzzy’.

The documents were a 2-page statement of academic and extra-curricula record from her son’s school, and his end of Year 12 school reference (1 page). Both had been scanned as images from the originals, and both were well over 4 MB in size, even though they were small in their number of pages.

I tried several methods using screen capture tools without much success, then remembered reading about something in Acrobat that compresses or reduces a file’s size. A quick hunt in the menus and I found it (in Acrobat 9 Professional, it’s PDF Optimizer under the Advanced menu).

I ran PDF Optimizer, leaving all the default settings as they were, and it reduced the file size for both documents to just over 200 KB each.

I was happy, Kristin was happy, her son was happy, and I didn’t even have to fiddle with any settings!

h1

Microsoft Action Pack Subscription

February 21, 2011

Wow! It took many many years, but FINALLY Microsoft have streamlined their MAPS (Microsoft Action Pack Subscription) process so that it just worked!

In previous years, renewing my MAPS has been a lesson in what not to do with an online renewal process. It’s taken forever, the information on the Partner website has been conflicting and confusing, the links in the renewal email have gone to the wrong place, I’ve had to call Microsoft Asia-Pacific to get things sorted out and even then my fax number from the past three years didn’t get changed 12 months ago — even after two phone calls and trying to reset it online. All in all, it’s been a bad experience for several years. So when I got the renewal email, I faced the prospect of renewing with some trepidation and fear, based on those previous experiences.

But this year it just worked:

  • The link in the email went to the correct page (though I did have to scroll down some way to find the renewal button).
  • The renewal link went to the correct page.
  • The website ‘knew’ who I was based on my Microsoft Live ID (yeah, supposedly it knew this in previous years, but I’d end up in a loop of multiple browser windows open and still getting nowhere).
  • The renewal process was quick and simple (it took less than 5 minutes, compared to HOURS of frustration in previous years). This was the BEST part.
  • All my details were on one page and when I edited them, the changes seemed to hold, which means the fax number I tried to get changed 12 months ago has now been changed.
  • The payment process was simple and quick, as was printing out the invoice and the receipt of an email confirmation of payment.
  • And almost best of all, Microsoft didn’t force me to use Internet Explorer to do this transaction (as in previous years). The page loaded in Firefox and did not redirect to IE.

It’s taken an awfully long time, but finally Microsoft have simplified what always should have been a simple process. Sure, there’s some room for improvement, but they’ve come in leaps and bounds from the torturous path I’ve had to follow the past few years.

Thank you, Microsoft!

h1

Word 2010: Wishlist for the Navigation Pane’s search

February 18, 2011

One of the neat new features of Word 2010 is the Navigation Pane. It seems to be a cross between the old Document Map, Outline View, and Find, with a few extra goodies thrown in. It really makes a navigating and rearranging a long document much easier.

However, while the Navigation Pane has some great features, here’s one it doesn’t have that I think would be a terrific enhancement — the ability to apply a setting to a selection of multiple objects found in the Search.

If you search for text using the Navigation Pane, you can’t replace that found text with other text unless you use the old Find/Replace dialog box (Ctrl+H). Fair enough — it’s available in another way, though it would be nice to do the Replace from the same place as Search.

If you search for an object (e.g. all tables) using the Search, they all appear to get selected in the document. However, this ‘selection’ is for appearances only — it’s not a real selection. I tried to apply a setting such as Auto Fit to Window to all the tables found in the search, but it didn’t work. It didn’t even work for the one I could see was ‘selected’ on the page to the right of the Navigation Pane.

Next, I did a Search for all graphics and tried to apply center alignment to them all at once using Ctrl+E. That didn’t work either.

I think this sort of functionality would really help with very long documents, and I think Microsoft missed a great opportunity by not providing it in Word 2010.

For those of us who have to edit long documents produced by multiple authors, things like auto fitting all tables and centering all graphics would save us a lot of time. Sure, there may be some tables and graphics that we don’t want to auto fit or center align, but these are the outliers that we can pick up and deal with individually as we’re working through the document.

If Microsoft is concerned that Word users may inadvertently make global changes like these without realizing the repercussions, make the ability to do so a Word Option, or show us a warning message if we try to do it. But to not provide this functionality when it’s SO close in the Navigation Map is a blow to anyone who has to edit many many long and complex Microsoft Word documents.

By the way, I found that you could select an entire node of the Navigation Pane (right-click, select Select Heading and Content) and apply a setting to that selection (e.g. center the lot), but you can’t do it for searched objects.

h1

Word 2010: Differences with Word 2007

February 17, 2011

A couple of months back I wrote a post on my first impressions with Word 2010, and a few weeks after that I mentioned some excellent videos on Word 2010’s new features made by TCANZ.

I’ve since used Word 2010 some more, and have jotted down some of the differences between it and Word 2007, as well as some other new features I found (some of which are the subject of separate blog posts).

Except for the FileWord Options and Help sections, I’ve arranged these according to the order on the Ribbon.

File

  • Yes! Thank you, Microsoft, for the return of the File option.
  • File options are clear and easy to use. Some excellent user assistance is available with each option, particularly the Print and Save and Send options.
  • Document information is useful.
  • Finding your own templates is much harder as they are stashed away under a single My Templates icon.

Word Options

  • General: Name change — it was called Popular in Word 2007.
  • Proofing: Spanish modes added.
  • Language: This is a new category; I haven’t checked it out fully yet.
  • Advanced > Image Size and Quality is a new section.
  • Advanced > Display has new option for disabling hardware graphics acceleration.
  • Advanced > Print has a new option for allowing fields containing tracked changes to update before printing. I haven’t tested this out yet, so I’m not exactly sure what it does or how it works, but if it saves me having to run a macro to accept all tracked field changes, that would be good.
  • Advanced > General: The Service Options button, which I never used, has gone. Was it replaced by the File > Save and Send options for Sharepoint Connectivity?
  • Advanced: I noticed that all the Smart Tag options were now gone, but I don’t know if they’ve been moved somewhere else (I couldn’t find them), or if Smart Tags have gone the way of the dodo. I checked the Help, but I couldn’t see any mention of Smart Tags.
  • Advanced > Resources category is no longer available in Word 2010. It seems that much of what was here in Word 2007 is now under File > Help in Word 2010.
  • Customize Ribbon: New. Can now customize the ribbon to some extent.

Help

  • Clicking the Help icon on the far right, displayed a single Help pane. Help wants to connect and show results from the internet unless you explicitly tell it to show help from just your computer. I’ve expressed my dissatisfaction with this default connected Help before, but it was in reference to Adobe’s Community Help. Microsoft is as bad. The problem with connected Help is that you usually get TOO much information that’s not necessarily related to what you want to know. It becomes overwhelming. And it’s a right pain for those on slow download speeds and/or capped internet plans.
  • There is a Table of Contents, but you have to click the little book icon on the Help’s toolbar to show it — it’s not displayed by default. 
  • There’s NO index! I really miss having an index as it provided another entrance into the Help. Full text search has its place but it’s no substitute for an index. Indexes have synonyms and cross references, which are missing from a full text search.

Home tab

  • Font group: Text Effects icon now available here (also accessible from the Font dialog box).
  • Font group: Gradients is now an option under the Font Color icon.
  • Font group: New toolbar icon for Change Case (though personally, I’ll still use Shift+F3).
  • Font dialog box > Advanced tab: More options for OpenType features, such as ligatures.
  • Font dialog box > Advanced tab: The Text Effects button is where you can now find font features like the Word 2007 Emboss, Engrave, Shadow and Outline.
  • Styles group: Change Styles icon: New Paragraph Spacing option.
  • Editing group: New Select > Selection Pane for Selection and Visibility for dealing with overlapping objects on a page (e.g. bring text boxes forward or back).

Insert tab

  • Illustrations group: New Screenshot option.
  • Picture: Many more options on the Adjust tab once you’ve inserted an image, including removing the background (very cool!), many more correction options (and more clearly displayed), and artistic effects.
  • Picture: More options on the Format tab once you’ve inserted an image, including adding Alt text under Picture Layout.
  • SmartArt has more ‘smart’ tools. (see also: https://cybertext.wordpress.com/2011/02/16/word-2010-step-by-step-smartart/)
  • Quick Parts: Auto Text is now an option on the drop-down menu, instead of only being available once you’d clicked Building Blocks. Auto Text is still in Building Blocks — they’ve just made it a little easier to find.

Page Layout tab

  • More themes.

Review tab

  • Language Preferences takes you to the new Language category in Word Options.

View tab

  • Navigation Pane is new. It replaces the old Document Map and combines features of Document Map, Outline View and Search. Very useful for navigating large documents.

Developer tab

  • Macro Security: More options/settings in the Trust Center.
  • New button for managing Add-ins.
  • New Check Box button in the Control group.
  • Specific Restrict Editing toolbar icon (in Word 2007, this was hidden under the Protect Document icon)

Other

  • Overall, there are a LOT more connection options to resources on Office.com in many of the drop-down menus.
  • File Location dialog box has not been touched. The box still cannot be resized, and nor can the columns displayed in the box be resized, sorted, or moved. The only way you can see a full file path is to select it and click Modify. This dialog box has been painful to use  for many years and still has not been changed in Word 2010. The File Locations dialog is found through Word Options > Advanced > General.
  • Cross-references dialog box has not been touched. I’ve blogged about the limitations of this dialog box before, so I won’t repeat them here.

See also:

h1

Word 2010: Step-by-step SmartArt

February 16, 2011

One of the graphics features that Microsoft really worked on in Word 2007 was SmartArt. It’s been further expanded in Word 2010.

In this mini-tutorial, I’ll show you how to create an image like that below, using Word’s SmartArt. All the images I used came with Windows, and are in the Documents > Sample Pictures folder.

Insert the SmartArt object

  1. Open a new Word 2010 document or go to an empty paragraph in an existing Word 2010 document. (You can do much of this in Word 2007 too, but the available shapes are more limited, and some of the steps may be slightly different.)
  2. Go to the Insert tab, then click the SmartArt button.
  3. On the Choose a SmartArt Graphic window, click Picture on the left, then select Accented Picture — the first one in that group. Note: Even though you choose one of the SmartArt shapes here, your selection isn’t set in stone — you can change it to another shape later.
  4. Click OK. The SmartArt object is added to your document.

Add images and text

  1. In this example, we don’t want any text for the main image (the flowers), so click away from the large text box into the blue rectangular area. The ‘handles’ should be around the rectangle.
  2. Click the image icon in the middle of the large rectangle to open the Insert Picture window.
  3. Navigate to the image you want, select it, then click Insert. I used the Garden image in the Sample Pictures folder.  We’ll get rid of the text later.
  4. Now click on one of the circles, then click the image icon in the middle of it and select an image. Repeat for the other two images.
  5. After adding your images, your SmartArt object should look something like this:
  6. Next, you’ll add text for the images. There are several ways you can do this — you can do one object at a time by clicking [Text] and adding your own words, or you can use the Text Pane window to add them all at once (either click the Text Pane button on the toolbar, or click the blue left/right arrows on the middle left of the SmartArt object’s ‘canvas’).
  7. In this example, I’ve added the words Whales, Turtles and Toucans for each small image. And I entered a space instead of text for the large flower image. Be careful — if you delete the text box for the large image, the image gets deleted too.

Add color and effects

While you may be satisfied with the result so far, there are more things you can do with your SmartArt object.

Some effects that I suggest you experiment with include these on the SmartArt Tools ribbon > Design tab:

  • SmartArt Styles group: Hover over the thumbnail options to see how different effects will look.
  • Layouts group: Hover over the thumbnail options to change the layout of the objects.
  • Right to Left button in the Create Graphic group: Switches the small  images in the circles on the right to the left side of the large image. Click again to go back.
  • Add Shape button in the Create Graphic group: Adds an extra circle to the default set of three. Keep clicking to add even more. To delete a circle, select its text box, then press the Delete key on your keyboard.

On the SmartArt Tools ribbon > Format tab, try these:

  • Shape Fill: Changes the background color of the SmartArt object; in my original example, I used an olive green fill and this is where I applied it.
  • WordArt Styles group: Allows you to change the style of the font, its outline and inner color, and add text effects; in my original example, I added a reflection effect and made the outline and inner sections of the letters the same color.

To change the font size for all text on the SmartArt object, select the entire object, then go to the Home tab and select a font size and font family as you normally would for body text in your document. To change the font size for just one text object, select just that text object and change the font size and family as normal.

Have fun!

A word of warning: If you use the SmartArt objects that are available in Word 2007 and Word 2010 documents, they are very unlikely to be backwards compatible with Word 2003. So if any of your readers, authors etc. are going to open your fancy Word 2010 document in Word 2003, it’s likely all your SmartArt will revert to plain text.

h1

Word 2010: You too can be an artist!

February 15, 2011

I’ve done a couple of posts recently on Word 2010’s improved graphics editing capabilities. They’ve also added another new one — Artistic Effects. By applying an artistic effect to an image, you can turn it into something that resembles a painting, a poster, a pencil drawing etc.

Here’s the original image as inserted into a Word 2010 document (yes, I have an affinity for turtles as I’ve learned a lot about them in the past few years with the work I’ve been doing):

And here’s the same image with some of the artistic effects available in Word 2010 applied:

So how do you get apply these effects?

  1. Insert your image, then click on it to display the Picture Tools ribbon > Format tab.
  2. Click the Artistic Effects button, then hover over an effect to see what it will look like for your image.
  3. Select the effect you want.

See also:

[Link last checked August 2012]